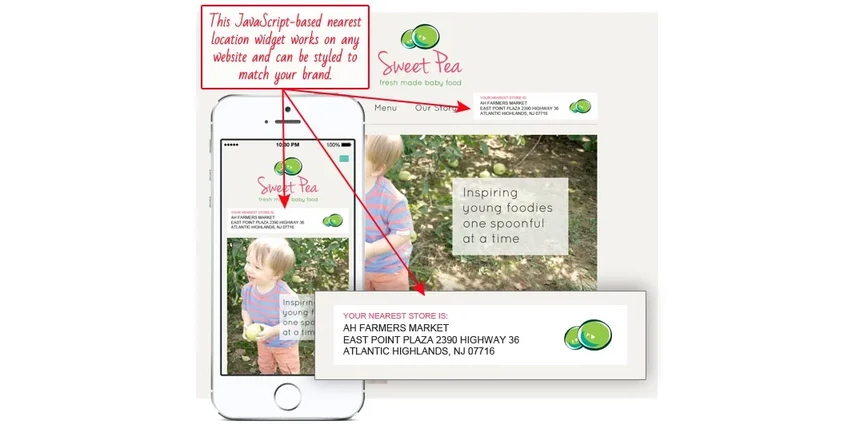
The need for such a banner may be that you would like your customers to find one of your locations that’s closest to them in a simple, effortless process. The banner works for both web and mobile sites. The code uses JavaScript to determine your user’s location and serves up a banner with location data retrieved from the Bullseye web service.
You shouldn’t need any extensive experience with HTML to complete this tutorial, but should have some knowledge. Let’s get started with the code. If you clone or download the source code on GitHub, you’ll see there are three files and a couple images. The three files consist of a single HTML, JavaScript and CSS file. These files have been commented extensively so that you can follow along easily.
Here’s a briefing on the purpose of each file:
bullseye-banner-example.html
This file demonstrates the minimum HTML that is required to create a functional banner. You’ll need a reference to the CSS file provided (you can use your own CSS, if preferred), a meta viewport tag, a reference to the jQuery Library and a reference to the Bullseye JavaScript file provided. (Note: If you already have these tags on your HTML page where you want to place the banner, you do not need to reference them again). After those references are in the Head of your document, you’ll need to call two Bullseye methods which are done on jQuery’s document ready method. These methods will generate the HTML and prompt the user to allow location sharing, triggering a call to the Bullseye web service. The only HTML that’s needed inside your body tag is an empty div which will house the HTML generated from the JavaScript.
bullseye-banner.css
This file contains the default styles. You can modify these or use your own StyleSheet if you prefer, but these should help you to get started or fill the need if you just want to keep it clean and simple.
bullseye-nearest-location-banner.js
This file contains all of the code which generates the HTML for the banner and retrieves location information from your user as well as from the Bullseye web service. There are several variables in this file which you should modify in order to get the banner set up. These have all been extracted and placed at the top of the code so you shouldn’t have any trouble finding them.
Now that you have some knowledge of the files that you’re going to be working with, let’s take a peek at what we’ll be creating. You can load the “bullseye-banner-example.html” file in your web browser. After it has loaded, it should ask you to share your location. Once you share your location, the banner will either display the location closest to you or a message if there is not a location around you in the radius specified. For demonstration purposes, we have used a test client and API key with a radius of 25 miles. You’ll need to change these later in the tutorial.
You’ve seen what the final product will look like so let’s get started with the implementation. First, you should have a web page ready that you would like to add the Bullseye banner widget. On this page, make sure you have a reference to all files/code mentioned above in the “bullseye-banner-example.html” file which should be a link to the CSS file, a meta viewport tag, a reference to jQuery, a reference to the “bullseye-nearest-location-banner.js” file and the document ready jQuery calls. This should be everything in the Head tag of the “bullseye-banner-example.html” file. After you have those references in place, you’ll need to add a div with an ID of “bullseye-banner-header” anywhere within your Body tag. If you want the banner to display at the top of the page like ours does, you should place this just after the opening Body tag. This div tag should be empty as the JavaScript will render all the HTML for this element. That should be it for the HTML.
var absoluteUrl = '';
If you’re going to be referencing files like images from another domain, you can add the URL here between the quotes. Otherwise, leave it blank.
var bullseyeApiKey = '3e3e1e95-b36c-4884-adfb-4e9343959419';
This is your Bullseye API key, which you can get by logging into the Bullseye Admin and going to your account page. Replace the demo value above with your actual API key.
var bullseyeClientId = '473';
This is your Bullseye Client ID, which should be available next to your API key in the Bullseye Admin. Replace the demo value above with your actual Client ID.
var imagesDir = 'images';
This is the directory where you will put the images for the loading and map icons. We provide these images by default, but you can replace them with your own. Here, our folder for the demo is called “images”. The final path is formed by appending this directory to the “absoluteUrl”. So, for this demo, since we don’t specify an “absoluteUrl”, our images folder is referenced relatively.
var linkToLocalLocator = 'https://www.bullseyelocations.com/pages/mobile/search.aspx?name=DemoInterface';
Here is where you should add a link to your locator page. If your users want to search further or if there is not a location near them, they can click to view your locator at this URL.
var locationTerm = 'store';
You can change the term text that displays in the banner for your locations if your locations are called something other than “store” such as dealer, restaurant, location, etc.
var searchRadius = '25';
This defines the radius for which to search based on your user’s location. It should be any logical number above 0. (Note: A larger search radius will increase the time needed to return the location data.)
If you don’t want to display the phone number of the location, you can set “displayPhone” to false. It is set to true by default.
var displayPhone = true;
Go ahead and change the variables which pertain to you. At the very minimum, you should change the bullseyeApiKey, bullseyeClientId and linkToLocalLocator. Once you have changed these values, reload the HTML page in your browser and you should now get one of your locations if there is one near you in the radius specified. If you are returning a location, this is great news! You have successfully completed the tutorial and implemented your banner. If not, below is a simple checklist you can follow to make sure you didn’t miss any steps.
- Make sure you have references to the StyleSheet, meta viewport tag, jQuery library and “bullseye-nearest-location-banner.js” in the head of your document. If your StyleSheetor JavaScript files are not in the same directory as your HTML file, make sure to change the paths to reflect where the files exist on the server or your computer.
- Make sure you have declared the necessary Bullseye JavaScript calls in your document ready function after your references to the jQuery library and the “bullseye-nearest-location-banner.js” file.
- Make sure you have placed the empty “div” with ID of “bullseye-banner-header” in the Body tag of your HTML file.
- Make sure you have modified at least the bullseyeApiKey, bullseyeClientId and linkToLocalLocator variables in the “bullseye-nearest-location-banner.js” file.
That should be it to get you up and running with a Bullseye banner widget that helps your customers quickly and easily access location information closest to them. If you’re interested in extending this banner, have a look at the Bullseye web service method used in creating this widget (https://api.bullseyelocations.com/v1.0/reference#dosearch2).
Related Posts
How to Implement Successful Locator Onboarding

3 Types of Businesses that can Benefit from Local Pages

How Bullseye can Help Craft Liquor Companies


Get location marketing insights delivered straight to your inbox
“*” indicates required fields